Thursday, July 28, 2011

Zach King: One Exceptional Filmmaker


So I've been perusing YouTube lately, and I came across this video called The YouTube Police. You can watch it right below if you haven't seen it before. It's really funny.


Since then, I could not stop watching this guy's videos. They are simply amazing creations. This editor's name is Zach King, and he hosts FinalCutKing.com, which is a website dedicated to teaching users the ways of Apple's Final Cut Studio suite, including Final Cut Pro, Motion, Soundtrack Pro, LiveType, and the like. He often works with Aaron, also known as thevfxbro on YouTube. Aaron specializes in visual effects training, and he too offers compelling tutorials on Adobe's After Effects program.

Zach King
Zach King's videos are absolutely outstanding. When you watch them, you can't help but imagine as  though he has an entire movie studio backing him up with thousands of dollars in budget money. In fact, it's just him, his Mac paraphernalia, his Panasonic HVX200 camera, Final Cut Studio, and a few friends. Yet his filming and editing techniques, combined with Aaron's mastery of visual effects, help produce content that is undeniably remarkable. Whenever he posts a video like the one above, he sometimes provides a behind-the-scenes-peek to show what happened during production, and it's always fun to watch behind-the-scenes videos. :)


I've listed a few of my favorite videos here (just a few):

(This was the second video I watched by Zach) Extreme Hide and Seek
A very intense game of hide and seek. Don't try this at home!


(Recently posted) Multiplayer Gaming
This is how gaming should be.


Office Warfare
Nerf guns are, in fact, extremely dangerous...


iChat Battle
I had no idea Macs could do this...


I am Fruit Ninja!
Zach King is Fruit Ninja!


Aaron has a tutorial on how to do these effects and he even provides a content pack with the free tutorial! Adobe After Effects Tutorial - Fruit Ninja


(Best for last!) Final Cut King is NextUp
Never come unprepared...


These are just a tiny sliver of the awesomeness on Zach's channel. I highly recommend you go look through most (if not all) of his videos. They are short, sweet, and insanely entertaining.

Be sure to check out Zach's Facebook page and his YouTube Channel and subscribe to him :)
And don't forget Aaron, thevfxbro! Visit his YouTube Channel and subscribe as well :)


I'm surprised the special effects and movie industries aren't all over these guys by now! Steven Spielberg really needs to give these guys a call!

I hope you enjoyed today's blog post, which actually wasn't a rant about how Apple sucks (I kid, I kid) :P.

Cheers!

Monday, July 25, 2011

Mac OS X Lion...in VMWare Fusion!

So I've found a super-awesome article explaining how to get Mac OS X Lion up and running in VMWare Fusion in Mac OS X (in my case, Snow Leopard).

Here's the link if you're interested in doing this yourself: Installing Lion in VMWare

I'll say that it runs pretty well on my MacBook Pro, which allocates 3GB of RAM to the virtual machine. Graphics performance is rather suffering, and I assume this is because VMWareTools haven't been updated for Lion yet. The OS itself is pretty quick, performing as it would natively installed.

Advantages to this setup:

  • I don't have to dedicate a separate partition to my Lion setup to use (and still try to get used to it).
  • I don't have to worry about issues that I might run into later by using Lion (I will explain another scary situation later).
  • I don't have to give up my beautifully speedy and functional Snow Leopard installation.
  • I can run Lion-specific programs without installing Lion to my hard drive.
  • If something screws up, you don't have to erase and reinstall—just use VMWare's handy little 'Snapshot' feature to 'rollback' your OS to previous settings.


Disadvantages:

  • I still can't figure out how to install iCloud. It throws a JavaScript error when I try to run the installer. *shrug* I'll figure it out later.
  • Graphics performance suffers. No smooth Launchpad or Mission Control animations.


Overall, though, it runs nicely enough. Then again, it is a virtual machine.

Scary Story:
I recently bought a brand new Seagate Momentus 750GB 7200RPM hard drive for my MacBook Pro (upgrading form the stock 250GB). First thing I did was run a clean install of OS X Lion on the drive, and then transferred everything over. Then I created a Boot Camp partition using the Boot Camp Assistant and installed Windows 7. Upon rebooting into Lion, I got an error concerning my NTFS-3G driver that I had installed and that my Boot Camp driver failed to mount. Quick Google search and I found Tuxera's NTFS drivers for Lion and installed them. Reboot. No error. I was thinking, "yes!" Too early to celebrate. I rebooted into Windows, installed some programs, played some games, hit "Restart Mac OS X" and went to go get a drink. I came back only to find my Mac stuck on the gray Apple logo with the spinning wheel. I figured I could wait it out. Waiting for 20 minutes didn't help. I rebooted the machine and it rebooted into Recovery Mode and launched Disk Utility. I ran the First Aid on my 'Macintosh HD' and got a pretty long list of errors. I clicked 'Repair Disk' and it fixed the issues. I rebooted the machine back into Lion without a single hitch. I figured it was a one-time error that I wouldn't see again.

Boy, was I wrong.

The next day, I rebooted into Windows to play some games (thought you could play decent games in OS X? I didn't think so either). After I was finished driving the heck out of Live For Speed, I restarted in Mac OS X, only to be welcomed by the infinitely spinning gray circle. So, about right here, my reaction was something like this:


Reboot into Recovery, run Disk Utility. Same list of errors. Something about Volume Header Corruption and a few others. At this point, I thought it was ridiculous to have to reboot twice each time after Windows to reboot into OS X.

This led me to believe that something may have been wrong with the new hard drive. Totally possible. So, I went to work and ran TechTool Pro 5 on my computer, and to my horror, the S.M.A.R.T. test showed errors when testing my drive.

Now what?

Well, I backup everything and erased the drive, starting with a completely spotless installation of Lion. I re-ran TechTool Pro 5 and found the same S.M.A.R.T. errors as before.

New hard drive time!

So to Newegg's website I ran to request a replacement drive. About a week later, I received my replacement drive, unpacked it, installed it in my MacBook Pro and ran TechTool Pro 5's  S.M.A.R.T. test. No errors. Perfect! I ran the Lion Installer to place a clean install on the drive. But this time, I partitioned the drive not only for Lion and Boot Camp, but for Snow Leopard as well. After Lion was installed, I installed Snow Leopard. Then Windows. Then Tuxera's NTFS driver for Lion. Reboot into Windows. Then reboot back into Lion.

Gray spinning circle of death.
Painful to watch for 20 minutes...
I was totally confused at this stage. But I thought I was progressing further into the problem. I re-ran TechTool Pro 5, and whaddya know?? The same errors showed up during the S.M.A.R.T. as before. Couldn't have been another bad hard drive, could it? It wasn't. Upon rebooting into Snow Leopard, I was greeted by the usual Aurora background. And no errors. Restarting in Recovery mode and running Disk Utility (for the 298729th time) revealed the same errors on the Lion partition as before, yet showed no errors on the Snow Leopard partition. Odd. So I trashed Tuxera's drivers and continued to use my machine in it's current state for about another couple of weeks or so, though mostly in Snow Leopard, because Lion was terribly unreliable at the time.

A few days ago, I decided to restart into Lion to update my iCloud stuff (since Apple was too lame to support iCloud in Snow Leopard). Guess what I was greeted by again? Yup. Infinitely spinning gray circle. Another restart, another chime...verbose boot revealed that the machine got stuck booting on....something different every time. Either it was something like "macosxswapon" or something else, but not the "fsck" check that it used to be stuck on. Four chimes later, it still didn't boot. At this point?


I trashed Lion completely. Now I live happily with Snow Leopard, the most reliable OS ever.


So how and why did this painful thing happen? I still haven't figured it out. But I am under the assumption that Lion hates my new hard drive. Snow Leopard and Windows work perfectly (WINDOWS WORKING PERFECTLY??? *GASP*).

Yes, Apple, when Microsoft's crap OS works more reliably than your new one, you've screwed up—terribly.

Anyways, I hope this wasn't too boring of a story. :P

Cheers!

Monday, May 30, 2011

Sorry for the lack of news...

...but I will get back to daily blogging as soon as school gets off my shoulders on June 10! In the meantime, read some MacNN, TUAW, or Engadget articles :P.

TUAW
MacNN
Engadget

Cheers!

Tuesday, March 22, 2011

Enable native mirroring on iPhone 4, iPod Touch 4, and Original iPad

Hey guys, sorry I haven't updated this blog in a long time, but homework, school, science fair, robotics competitions, and other stuff have been taking up all of my time. But anyway, I have a cool tip for users of iPhone 4's, iPod Touch 4's, and the original iPad:

Apple only permits display mirroring on the new iPad 2 (probably because of its blazing fast A5 chip), but that doesn't mean we (original iPad owners) can't have fun with this as well. Enabling display-mirroring on an older iOS device is as easy as:


1. Restore and jailbreak the device using PwnageTool (or sn0wbreeze for Windows users) with iOS 4.3.

2. Use iPhone Explorer to browse the jailbroken's iPhone's root filesystem (you may need to install afc2add from Cydia to be able to see the root FS)

3. Go into "/System/Library/CoreServices/Springboard.app/" and find a file labeled either N90AP.plist (iPhone 4), N81AP.plist (iPod Touch 4), or K48AP.plist (original iPad).

4. Grab that file and put it on your desktop.

5. Open it up in a text editor, plist editor, or Xcode 4, and add a capability called "display-mirroring" and set it to "true"

6. Save the file onto your device and respring.

7. Plug into the TV via the VGA dock adaptor or the HDMI dock adapter and enjoy!

Apple's built-in mirroring method is smoother and more responsive than DisplayOut on Cydia, and it's also free (because it's built-in). I've tried this with intensive games on my iPhone 4 (Real Racing 2) and it isn't exactly console-quality, but it's pretty darn good. Plus, if you use the HDMI adapter, you gain sound output functionality. So, essentially, you can carry around a gaming console in your pocket that only needs one cable to be able to play games on any HDMI equipped TV  :)   Oh, and seeing your iPad/iPhone's screen on the TV (and or projector) lets you give "Stevenotes" (Steve Jobs-style presentations) to an audience :P

Cheers!

Friday, February 4, 2011

Open Source 3D: Blender

Anyone interested in 3D design and animation (and wants  to avoid paying $300+ for 3DS Max) might want to look into this nifty little program:

http://www.blender.org/

Thursday, January 27, 2011

Websites for geeks!

I have a two websites in particular that entertain me in my spare time.

The first is Hatetris. This is a very spiteful Tetris clone that is designed to give you the worst possible piece. WARNING: very addicting, frustrating, and I am not responsible for any damage that may occur from your insanity after playing this game. My high score is 5. I have friends who have reached 12 points. Can you beat it? Play HATETRIS.


Then there's this thing: http://www.hackerskills.com/ Any geek out there that has a little spare time will have lots of fun with this website. There are 100 levels that you must hack your way through. Have fun!


Cheers!

Sunday, January 16, 2011

Another discovery about iOS 4.3 and downgrading...

The iPhone 4 Baseband version is 03.10.01 on iOS 4.2.1. (or at least it should be *eyeing ultrasn0w unlockers* :P)

Normally, when you update an iPhone, its baseband is updated to the newer version and cannot be downgraded. But after updating my iPhone 4 to iOS 4.3 beta 1, I expected a baseband firmware change, and it happened the way it should have: 04.xx.01 (can't remember all of the numbers).

But...


Upon downgrading back to 4.2.1, I expected iTunes to throw an error at the end of the restore, indicating a baseband issue (since it technically cannot be downgraded). Instead, I got no error, went to "Settings" --> "General" --> "About," (on my iPhone) scrolled down to the bottom, and, as impossible as it might seem, my baseband version is back to 03.10.01!

I've never seen this with a beta before, and didn't think it could happen because of my past experience with my iPhone 3G (upgrading to 4.1 beta, and then downgrading back to 4.0).

But anyway, that's it for now.

Cheers!

Friday, January 14, 2011

iOS 4.3 Beta 1 jailbreak is possible without PwnageTool

So iOS 4.3 beta 1 has been released to iPhone developers. And the claimed PwnageTool jailbreak came with it. BUT! The PwnageTool jailbreak does not work (at least not for me), and I've confirmed this with numerous restores, consistently receiving 'Error 1600'.

But that's not the end.


I have just found out that redsn0w 0.9.7b4 is perfectly capable of jailbreaking the new iOS version (albeit Cydia cannot be installed) on the iPhone 4. I can confirm this only on a Mac (I'm using OS X 10.6.6). There is a baseband update (04.08.00), so unlockers don't you dare continue reading.

I have a guide on how I did it (remember, Mac-only, I cannot confirm this method on Windows). But before you carry out these steps, remind yourself that, unless you are a geek, don't try this. I am not responsible for your brand new, shiny iPhone 4 exploding, setting your house on fire, or turning off gravity. PROCEED AT YOUR OWN RISK! 

Prerequisites:
1. Download iOS 4.3 beta 1 for iPhone 4 (I'm sorry, I cannot provide a download link as I am not authorized to redistribute Apple's beta firmwares, but google is your friend).

2. Download redsn0w version 0.9.7b4 (I have only confirmed this with 0.9.7b4, nothing else) here.

3. Download iOS 4.2.1 for iPhone 4 (as this is what redsn0w recognizes and retrieves the files to patch) here.

4. Make sure iTunes is up to date with version 10.1.1 (just go to  --> Software Update).

5. You'll need PhoneDisk to do this (I couldn't get it to work with iPhone Explorer, but someone may be able to do it).


The process (if the terms DFU mode and root filesystem mean nothing to you, you're not a geek, leave now, because you aren't ready to do this :P):

1. Fire up iTunes, plug in your iPhone 4, put it in DFU mode (you better know what this means if you are attempting this tutorial).

2. Do a custom option-click restore and restore the device to the iOS 4.3 beta 1 firmware that you somehow obtained.

3. Wait for the restore to complete.

4. When the phone reboots, you'll see the usual 'Slide for Emergency call screen'. This is normal.

5. If you aren't a registered developer, iTunes will reject your device as 'unregistered' and your device is officially bricked (JUST KIDDING). Here's where the actual jailbreak to bypass this locked screen comes in.

6. If you have ever jailbroken a beta firmware to bypass UDID registration, you may recall chaning the SystemVersion.plist file to achieve this hack. We will be performing this hack on this firmware as well.

THE JAILBREAK (the scary part)

7. Launch redsn0w and browse for the 4.2.1 firmware. This is the firmware that redsn0w uses to extract and patch the boot files.

8. Click 'next' and uncheck everything (including Cydia because installing Cydia does not work, I have found out from experience.) Make sure your device is off and click 'next'.

9. Click 'next' again and follow redsn0w's directions on getting into DFU mode. Then wait patiently as it exploits the device.

10. Wait for the scrolling machine output on the iPhone. You will eventually get to a blank screen, the device will freeze. Don't panic. Hold down the home and power buttons to reboot the device.

11. Launch PhoneDisk (or iPhone Explorer, whichever you are using). Wait for the device to finish booting. It will get to the 'Slide for Emergency Call' screen again. Don't worry about it now. Go to PhoneDisk (or iPE) and navigate to '/System/Library/CoreServices/' and in here you will find a file named SystemVersion.plist. Open that file in a text-editing program and delete the following strings:

<key>ReleaseType</key>
<string>beta</string>

Deleting these strings will trick iTunes into thinking that this is an official firmware release, and not a beta.

12. This part is what got me stuck at first, but this was because I checked 'install Cydia'. Reboot the device now. iTunes should let you access it now without bothering you about UDID registration.
You can now hit 'restore from backup' and enjoy using the device as usual.

So there you go, jailbroken iOS 4.3 using a 4.2.1 firmware bundle. It's kind of useless right since you cannot install Cydia, but the proof-of-concept is there: iOS 4.3 beta 1 is still vulnerable to the same exploit that jailbreaks 4.2.1. The root file system is accessible to the user now. And you have 4.3 beta 1 without UDID registration. And it's untethered. This is the process that worked for me, but it may not work for everyone. And again, this is ONLY on a Mac.

Go ahead and post comments, corrections, rants about how this didn't work for you :P and success stories. Go discover new features in 4.3 that weren't in 4.2.1. I'd love to post screenshots, but at the time of writing this post, my iOS 4.3-powered iPhone 4 is syncing with iTunes (re-syncing everything back from the restore).

Cheers! (and please don't burn your house down or anything)

Thanks to iPhone Dev-Team for their super-awesome redsn0w program :)

Thursday, January 13, 2011

Apple Listens


Remember when the first iPhone came out? It had no video recording, no MMS capability, a 2 megapixel camera, couldn't run third-party apps (officially), had only EDGE (no 3G), and lacked GPS. But yet it revolutionized the cell phone industry by introducing an extremely competitive device with a good, capacitive touchscreen and an intuitively designed operating system based on Mac OS X. People were overwhelmed by what the iPhone could do, not what it couldn't do.

The iPhone 3G came along and added these missing features. But not all of them. Critics of the iPhone still rubbed the existing drawbacks in Apple's face. The list of questions was something like this:

Where is the video recording?? My old cell phone can do it!
Where is voice dialing?? My old cell phone can do it!
Are we going to get a way to install apps on this thing? My old cell—(you can fill in the details)

But there were improvements: 3G data speeds, GPS (for navigation and geotagging photos), and the iPhone App Store (this being the biggest).

Then the iPhone 3GS came out with a much faster processor, video recording, a 3 megapixel camera with tap-to-focus and autofocus, voice control,  and a compass for more accurate GPS navigation. And guess what? It added almost everything that the iPhone 3G lacked. And then came the criticism:

No multitasking? Seriously?
No HD video recording??
No 5 megapixel camera??
No Verizon iPhone still?
We still can't set a wallpaper for our homescreen?


Then Apple announced iOS 4, which gave the iPhone 3GS multitasking capabilities, tap-to-focus video recording, and you could set the homescreen wallpaper to whatever picture you wanted to. Following the sneak peek of iOS 4, the iPhone 4 was released and was much faster than the 3GS, could record 720p HD video, and had that longed-for 5 megapixel camera.

And just recently on 1/11/11, the Verizon iPhone 4 was announced.

See a pattern? Apple addressed almost every user concern over the years. All it took was time.
People just couldn't wait. They thought Apple was an arrogant control-freak and that they could care less about their users' complaints. But it was, in fact, the opposite. Sure, Android could multitask from day one, but could it do it efficiently? Not really.

The reason it takes Apple quite a bit to implement something that should be there already? Quality. They are focused on doing the job right – the first time. This is why it took Apple 3 years to implement multitasking on the iPhone. It took them 3 years to research the flaws in traditional multitasking methods (Android, Backgrounder). It took them 3 years to come up with a method that wouldn't drain your battery in 2 hours and wouldn't bog down the performance of the phone. It took them years to work with Verizon to get a CDMA version of the iPhone out. It took them years to get a very accurate, easy to use voice control system. You get the idea (hopefully :P).

An example is the iPad's orientation lock switch/mute switch conflict. When Apple switched the orientation lock switch to become the mute switch, people groaned and moaned, but Apple was listening. Proof? iOS 4.3 Beta:


So Apple did in fact listen to the user complaints, but instead of reverting the functionality of the switch to its previous state, they now give you a choice of whether or not you want it to act as a mute switch or an orientation lock.

It takes time for technology to get better. Things like that don't happen at the speed of Google. Speaking of Google, they keep improving Android as well. Android 2.2 Froyo, for instance, offered a huge performance boost to most Android devices running 1.6.

Bottom line, be patient! :P

Cheers!


Saturday, January 8, 2011

Cellular Data Conservation tips on the iPhone

For anybody who has an iPhone (or an Android device) with a limited data plan (instead of the previous unlimited plan), it may be quite troublesome to keep that data usage under control, especially if you are in the habit of data-crunching unconsciously from your unlimited plan). From my experiences with the 200MB data plan, I've come up with a few tips that can help conserve data and make it last the entire month:

1. Turn off data sucking apps that you don't need to use. I'm not including Mail in this because push mail least of my worries (it doesn't use as much you think, unless you get loaded with email daily). Such apps would include internet audio streaming (Pandora, TuneIn Radio), and GPS apps that receive traffic information (Navigon). I haven't really found news apps to be a data hog (AP Mobile, and others). This also applies to Android devices, whose multitasking is much more active than iOS (and thus has the ability to drain battery and cellular data quickly). Kill the apps that you don't need so that they don't run your data reservoir dry.

2. If you are on the 200MB plan, don't you dare use YouTube while on the cellular network. It can obliterate as much as 10-20 megs in one video. If you are on the 2GB plan, try to use YouTube sparingly, otherwise, you'll rip through those 2 gigs quickly. I'm pretty sure this applies to Android devices as well :P

3. Keep track of your data usage by periodically going to your phone app and dialing (not texting) *3282# and this will have AT&T send you a text message saying how much data you've used out of how much you have left (this applies to any AT&T smartphone, not just the iPhone). I find it useful to divide the amount I have left by the number of days left until the billing cycle, just to see what my daily usage limit is. It really helps.


4. Use DataMan ($1.99, iOS), a data usage tracking app on the App Store. I found it extremely useful. It allows you to set daily, weekly, and monthly limits on your data usage that helps you stay on track with how much you are using. It allows you set the percentage at which you would like it to remind you of how much data you've used today, this week, or this month. It can also do precise checking of your consumption every 10 minutes, geotag your location so you can see on the map where you used a certain amount of data (you can turn this off), and it also allows you to check your data usage history through a certain period of time (which you define). Bottom line, this app is a must for anyone with the 200MB plan because there is always that voice in your head going "WATCH OUT! If you go over they WILL charge you!" :P There is a lite version that doesn't allow you to set daily and weekly limits, only monthly.

I use these techniques and 200MB always lasts me. The closest I've gotten to my limit was 195MB, and that's with daily web browsing, Facebooking, checking email, news -reading, and instant messaging (I hate SMS texting, costs way too much). I hope these few tips will help some people stay in control of their data usage on their limited-data-plan-equipped iPhones. If you are wondering about Android devices, there are great apps on the Android Marketplace that are comparable to DataMan. Dialing *3282# goes for any AT&T smartphone that has a data plan.

Cheers!

Thursday, January 6, 2011

Mac App Store is here, and it's pretty impressive!


The Mac App Store is finally here! Snow Leopard users can grab it by going to Software Update in the  menu.

So TUAW has their impression of the new Mac App Store and I have my impression: awesome.

Just plain awesome.


Apple was right, the process is ridiculously simple. You launch the application, go to the menu, select sign in, enter your Apple ID (that you also use with iTunes), and that's it. Browse the store, click an app, and click "install." It is that simple.

So how are the apps? The ones I have tried so far are truly great.
Some apps that I have downloaded include AutoDesk Sketchbook Express (Free), Chopper 2 ($.99), and MindNode (Free).

Sketchbook Express is a drawing/painting app that is free and fun to use. Think of it as a Photoshop alternative, but not quite as full featured. There is a pro version that expands upon the features, but I found the free version to be plenty of drawing fun. Here are some screenshots:


 Then there's Chopper 2, which is a fun side-scrolling, 3D helicopter-flying game. It's quite fun, the graphics are good, and there are plenty of levels in which you pick up civilians, blow tanks up, and shoot bad guys. It's only $0.99 for a limited time, so go get while you still can! Screenshots:


And finally, there's MindNode for Mac. It's free, and it's a node-organization-style app that lets to you organize and present ideas in a flow-chart manner. It doesn't do much, but what is does it does pretty well. It's also pretty cool and very easy to use. Screenshots:


So that's only 3 apps (out of the, what, 1000 out there?,) that I have shown you. Be adventurous, explore the new store, and find yourself some good apps. Some, not all, of my existing third-party apps were detected as "installed." Out of those included MenuDrop and some others (can't remember :P).

Have fun!

Tuesday, January 4, 2011

App of the Week! Tapic (iOS, $1.99)

I was a big fan of Tapulous's Tap Tap games since Tap Tap Revolution from the good 'ole days of iPhone OS 1.1.4. But lately, I've tried Tap Tap Revenge 4, and it just didn't feel like the original games (TT Revenge 1 and TT Revolution). And so I saw a list of ten apps that were free for a limited time.

And then I read about Tapic.


And it said that Tapic allowed you to play any song from your iTunes library like TTR. And I found it pretty amazing. So you guys need to check this app out. There is a lite version for free, but I say just go for the full $1.99 version. It's better :P

Screenshots:


So how is the gameplay? Truly great. You select a song, it generates the notes for it, and then you choose a difficulty and play it. I found it to work the absolute best on electronic and dance genres, although it works fine on all of them. I really recommend this game to anyone who is bored of Tap Tap's restriction on buying songs from them and not being able to use your own.

So go grab it and tap away at any song you please :P

Cheers!

Monday, January 3, 2011

Mac App Store – Not the first of its kind!


I'm getting quite pumped about Apple's upcoming Mac App Store—purchasing applications in one click, using your iTunes account to do so, one-click updates, and easy ways to find great programs for your Mac. Imagine game developers from the iPhone making there games for the Mac. I'm sure Gameloft, Rovio, Chillingo, Firemint, Vogster, and other great iOS developers carrying their awesomeness to the Mac platform. The Mac will surely get a boost in gaming (if the devs decide to pursue such a thing). Sure, Game Center support isn't available yet, but that's a nitpick, considering Apple will very likely add that feature if gaming gets big enough. And of course there probably will be a flood of Twitter clients, like on the iPhone App Store. But of course, how is Apple going to release an App Store on the Mac without imposing its restrictions. I agree that they will probably get some developers to rage over their app being rejected. That's Apple for ya.

But I've also got to mention that Apple's new App Store for the Mac is not the first of its kind (an application catalog provided by the developer of the operating system).

Whaaaat???


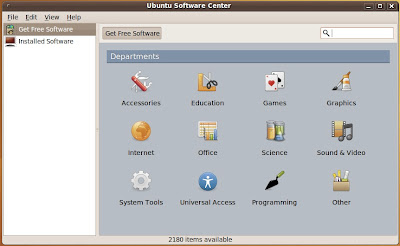
No really, Ubuntu Linux is one OS that has had this sort of one-click install, "app store," for quite a while. And I have to say, I really enjoyed its simplicity. It is really as simple as type in the search box "Netbeans" (for example), click the Netbeans program in the list, and click "install." I wonder if Apple got it from them.... :P

Here are some screenshots from Ubuntu Linux 9.10:


So you get the idea. Now go download Ubuntu and ditch your current OS (just kidding ) :P

Cheers!

Sunday, January 2, 2011

AirPlay Expansion

I figured anybody who has an AppleTV 2G and an iPhone/iPod Touch/iPad/iTunes-enabled computer has tried AirPlay at one point or another. It is pretty awesome to be able to stream photos, videos, and music with one tap from the iOS device to the TV. But some of us geeks got hobble by the limitations such as:

Why can't stream from MobileSafari?
Why can't we stream from AppStore apps?


Well, those questions have been defeated by our hacker friends. AirVideoEnabler is a Cydia hack that enables video AirPlay in third-party apps on the iOS device. This opens up possibilities such as: streaming internet TV to your TV from an app, streaming from the iTunes app, and streaming from MobileSafari. Now, this only goes for video because any app that plays audio (such as Pandora) can already stream audio to the TV. AirVideoEnabler works great, streams smoothly, and is kinda fun to use.

But, wait! There's more!


So you can stream video, audio, and photos from your Mac to your TV via iTunes. But you can't stream anything outside of iTunes. Bummer....


Oh wait a second, that limitation has been defeated by Erica Sadun :)

Erica Sadun has written a great application for the Mac, called AirFlick that can stream basically anything to your AppleTV from your computer. You can stream PDFs, photos not in iTunes, video files from your computer, internet URLs, and even your screen!

And the fun doesn't stop there.


She has also written an application that allows your iOS device to stream to your Mac, in the event that you have a Mac Mini running your living room media center instead of an AppleTV 2G. It's called AirPlayer.

There are even apps that allow this in Windows, but I can't remember what they are called :P

So go have fun with your TV and your iPhone :P

You can grab Erica's apps here.
AirVideoEnabler is available in Cydia for free.

Cheers!

Saturday, January 1, 2011

So this is my first post...

So basically, in this blog I'll talking about stuff going on in the tech world, giving tips here and there, and maybe throwing out a few ideas of my own. But in the mean time...

The Cheap iPhone Tripod Solution (assuming you already have a tripod and something that attaches to it):

The iPhone 4 is one truly amazing pocket camcorder. It takes beautiful 720p HD video, you can use iMovie directly on the device to edit video and turn them into a masterpiece of a movie. And the best part is, your movie can reach YouTube before it reaches your computer. But one things bothers me:

How can you stabilize those shaky video clips?

Of course, you could buy one of those cases for your iPhone (or iPod Touch) that also attach to a tripod. But I've had a Canon PowerShot S40 for quite a while and I originally bought the tripod for that camera. But when I purchased my iPhone 4, it replaced my Canon completely (the camera kept giving me an "E18" error, which is a broken lens). So now I have my Targus Grypton Tripod, no way to attach my iPhone to it. 

But wait!

 I've come up with a way to attach that iPhone to the tripod using an old camera and some rubber bands. It's a really...umm....cheap way of doing it but, hey, it works beautifully :)

Here's a couple of pictures:


I took an old HP PhotoSmart camera and attached my iPhone with rubber bands to it. Then I bolted on the PhotoSmart to the tripod and, voila! Instant tripod solution! So this kind of gives you an idea of the kinds of things you can do to shoot better videos with your iPhone instead of spending extra money. This solution is works great for me and my videos look better because they are no longer shaky.


So anyways, good luck guys coming up with crazy cheapo solutions (like the one above) to tech annoyances.

Oh, and Happy New Year! =P